August 11, 2012

Cakes for a birthday party - 11/8/12

 You may have noticed that I like baking with my friends. One of those friends is Esther, who has her own recipe blog at 'La Recette du Misther' (as long as you can read french!)
So for her birthday she decided to have an afternoon tea party, and asked me to bake a cake.

Well I looked through my recipe books, and couldn't decide which cake to make so I baked three:
Chocolate cherry cake, bara brith, lemon cheesecake
They're actually three cakes I haven't baked before! They're all Good Food magazine recipes so I can post links for you.
The chocolate cherry cake is a variation on the chocolate raspberry cake I made for a friend's birthday last year (here) - I just replaced the raspberries with cherries. (original recipe here)
E is for Esther!
The lemon cheesecake (recipe here) is quite similar to a vanilla cheesecake I made around christmas time, though that had chocolate digestives as a base instead of plain, and white chocolate grated into the cheesy bit instead of lemons. I accidentally bought two lemons and a lime instead of three lemons, so it's technically a lemon & lime cheesecake. I found citrus flavoured sprinkles in the shop and couldn't resist them to decorate it!
Tasty cheesecake!
 Finally the bara brith (recipe here).My previous attempts at bara brith involved yeast and went terribly wrong, but this one has self-raising flour instead so it's basically a more interesting tea loaf.
Lovely sugary bara brith

It has sugar crystals on top of it for added crunchy tooth rotting goodness!

So I made toomuch cake, there's lots left. Oh well!

August 06, 2012

Birthday Cake - 30/3/12

I haven't made many cakes lately as I've been mainly concentrating on sewing, but it seems that I forgot to write a post about the cake I made from my mum's birthday in March.

It was a chocolate cake (because my mum loves chocolate!)
I was going to try to make lots of flowers as she is a florist, but I ran out of time so I settled for the ring of buds and writing 'mum' in daisies.

In the end she got two cakes as she made herself a battenburg too! They were both tasty!

Christmas cake - December 2012

I really have been bad at blogging lately - I even forgot to post about how I adapted the top layer of our wedding cake for Christmas.

You may recognise me from a larger cake....The hearts are the same, the ribbon is new!

All I did was change the ribbon and add a decoration to the top as I was quite busy before Christmas. The three months had made the cake mature nicely though, so it was very tasty!
Here's what it looked like before:


December 04, 2011

Christmas gingerbread - 4/12/11

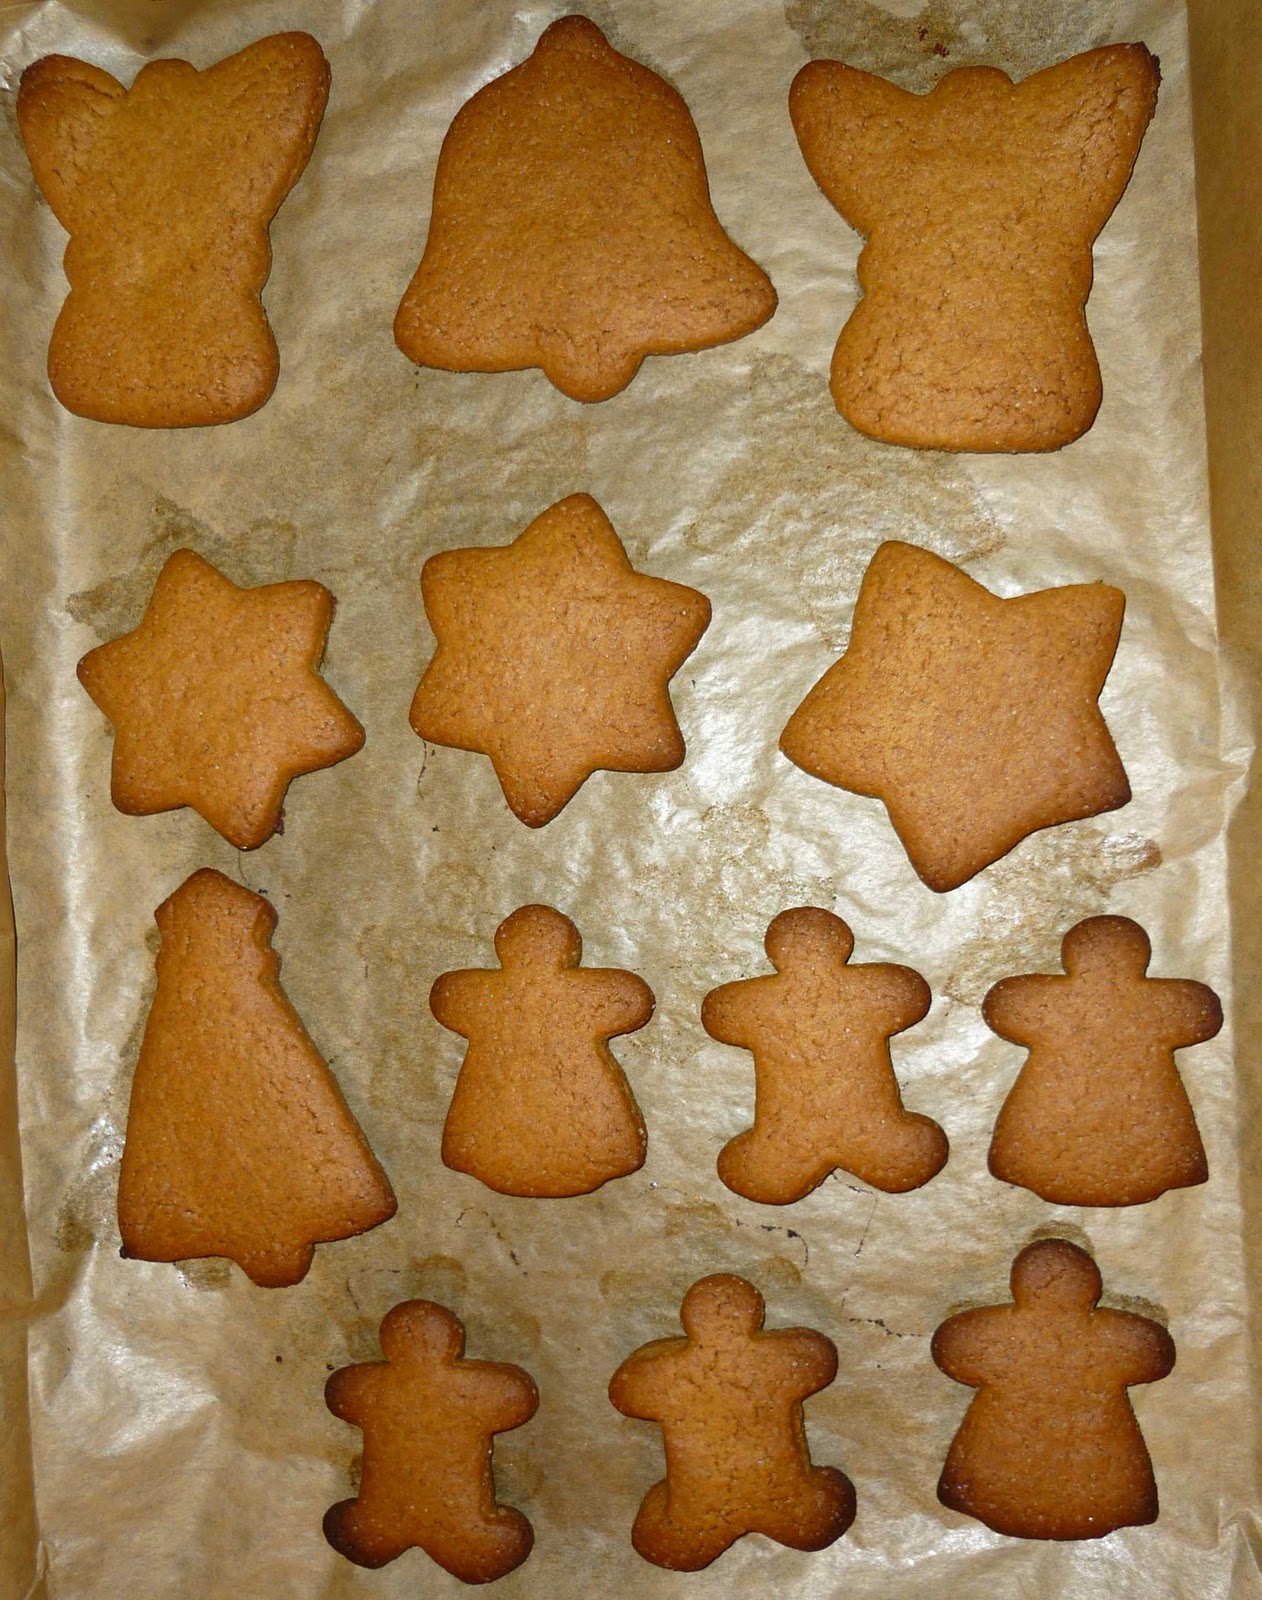
It's been a while since I posted! I have been making a few cakes, but not so many as I used to. I have a recipe for gingerbread houses, so I decided to try out the recipe to make some gingerbread shapes.
I made different shapes including angels, stars, trees and peopleSome of the first batch burnt, so I turned the next batch halfway through

If you want to make them yourself, the recipe is from Good Food magazine (I used a quarter of the quantities given to make this many shapes)

I should probably ice them before I eat them all, but they're so tasty...

September 25, 2011

House cake for a house warming - 24/9/11

My friends moved to a new flat recently, so i made them a cake for their house warming party. I decided to make a chocolate cake because I already had all the ingredients (and also chocolate cake is tasty!) so I made a loaf cake because the recipe for that is quite simple. Then I cut the top of the cake where it had risen to make a steeper roof, and coated the cake with chocolate ganache.
The doors and windows are made out of fondant icing because I didn't think to get any white chocolate for them!
Front of the house
Back & side of the house

The chimney is a piece of cake and the roof has mini marshmallows along it.

The ganache is quite simple to make:
100ml double cream
150g dark chocolate, broken/chopped into small squares (or dark chocolate chips)

Chop up the chocolate and place in a bowl
Bring the cream to the boil in a saucepan
Pour the hot cream over the chocolate and stir until it is smooth.
If the cream does not melt all the chocolate, you can melt the mixture over a pan of boiling water like normal chocolate, but the cream should be hot enough to melt it all on its own if you pour it over straight away.

The cake is a recipe for a two pound loaf tin, I made it in a tin 20cm by 10cm (8 inches by 4 inches). The ganache will cover a cake this big quite easily.

September 16, 2011

Wedding cake flower spray - 8/9/11

So, in my previous post, I described the individual flowers I put in my wedding cake spray.
Before I'd started making them, I'd done some sketches to work out what I needed and how big the flowers should be.
So once I'd made up the stems of flowers, I had to make a cake-shaped box to help me arrange the spray properly. This was made up of various boxes and a block of oasis to stick the flower pick into (I'd got two big posy picks as well as some smaller picks, so that I could have a set for the cake and a set to transport the flowers with).

Then to arrange the flowers. I had two single calla lilies, two stems of lisianthus with leaves, two stems of freesias and five stems of spray carnations with rose leaves.

In the end, I only needed three stems of carnations so the other two went on top of the cake, the spray going from the bottom layer up the sides.
The final spray looked like this:
Yes, that is an icing sugar box posing as a cake!
And here is a photo my friend took of the cake all assembled and ready for eating:
Tasty tasty cake!
You can probably see that the main posy is actually in three separate picks because the lisianthus stems were too big to fit in with the rest of the flowers. What you can't see is where the icing cracked on one side because the picks were too close to the edge of the cake...

This cake is two layers of fruit and one layer of madeira, each layer is on a thick board (the middle madeira layer is actually on two boards as it was shorter than the fruit cakes!), with ribbon around the edge of each cake & board. The lower cakes have dowels in to support the upper layers. The top layer has pink hearts inlaid into the sugarpaste as well as the flowers.

September 05, 2011

Wedding cake flowers - 29/8/11 to 5/9/11

Calla, showing the curve of the petal
In between baking the fruit and madeira cakes, I've been making sugar flowers. There are two lots.
First the favours which will be callas made out of sugarpaste, as in this post, but everyone is getting one each in the end as three hundred sugar callas is too many for me to make. I've done the sticks and the stamens for these (and I still haven't done a tutorial. Whoops.)
Then I decided what flowers I was going to put in the spray to go on the cake. These are made out of flower paste, which is less brittle than sugar paste (but also less tasty!). I decided on freesias, lisianthus, carnations, calla lilies and rose leaves as these will all be in the actual flowers as well.
I've been making these flowers for the past week, working for a few hours each day, and I finished making the individual flowers today. Then I need to make them up into stems, and then assemble the stems into a spray.


Individual freesia buds & flowers taped together into a spray
The tutorial I made for freesias is here, though I do now have a freesia cutter with three separate petals, and it's easier & quicker than the method I used in the tutorial. I did the biggest freesias using the original method as I needed bigger petals than the freesia cutter made.

The carnation tutorial I made is here, but instead of just folding a stamen I wrapped florists tape round a hooked wire to have a firmer base to start from. As I am making carnations which are white with pink tips, I also painted the edges of the petals with pink food colouring using a fine (no.1) paintbrush once the flowers had dried.

The callas I made on wires rather than wooden sticks so that I could shape the wires in the spray. I used three gauge 18 wires, taped together with flower tape all down the length. This also made the wires green as my gauge 18 wires are white! I found that the inside of a kitchen roll is good to rest them on while they dry, as they curve properly at the back of the flower. A large rolling pin would be equally good.
Spray of lisianthus with heart-shaped leaves

As for the lisianthus (latin name is Eustoma), which look like this in real life, I found a rather complicated tutorial here, which I followed to make the stamens etc and then simplified. Instead of wiring each petal separately, I used a gauge 18 wire for the stem and then made the flower in a similar method to the first flowers I made (remember these?), wrapping the petals around the stem before glueing the final one. This worked for some of them, but for others I hadn't made a big enough lump for the ovary so i had to add extra sugarpaste to attach the petals to. This is working so far. The lisianthus are white with purple edging, so I painted the edges of each petal with purple food colouring once the flowers had dried. This helps to highlight each separate petal, though it takes a while as you have to keep it neat!


As a guide, this is what I have made and how long roughly each bit took:
Spray carnations with rose leaves
Freesias - 2 stems, on each stem 1 small bud, 2 bigger buds, 1 nearly open bud, 2 open flowers, 1 bigger flower. Altogether these took me about 4 hours over two days.
Leaves - 18 rose leaves (some big, some small), 16 heart-shaped lisianthus leaves. These took two or three hours.
Carnations - 10 individual flowers (to be made into 5 stems with two flowers on each). These took about two hours to make, and another two hours to paint the edges of the petals.
Callas - 2 individual calla lilies, these didn't take very long at all but I had to let the stamens dry overnight so probably two half-hour slots would make these.
Lisianthus - these took the longest, as I hadn't made these before. Making the stamens was quite fiddly (though it could probably be simplified to make it slightly less botanically accurate). I think these took at least 4 hours, with another hour to paint the edges of the petals.

Now I've updated with pictures of the flowers, you can have more of an idea of what I've done.

September 04, 2011

Baking wedding cake - august/sept 2011

I decided not to bake the cakes until I was in the correct country, so I didn't have to transport cakes as well as everything else. This did mean that I had to bring my cake tin (luckily it folds flat. See this post), my scales and several other things as well as all my icing things! I did manage to forget a mixing bowl though (fatal error), so I had to buy some cheap ones along with the ingredients.
The top and bottom layers are fruit, so I baked those a couple of weeks ago when I first got here. They are 6 and 10 inches square. The middle layer is 8 inches square madeira cake, and that was baked yesterday, so tomorrow I am going to add marzipan and then icing.
Apologies for the lack of pictures, I don't have a digital camera here so you'll just have to see pictures of the finished cake when it's done.

August 19, 2011

Cake on a plane - 1/8/11

I was going to a funeral, and I'm not very good at arranging flowers so I thought that I'd make a cake with a bunch of flowers on top. So I looked online for pictures of flowers that I could use as a base, and I found this page of colouring sheets. I then simplified the picture a bit more using paint.net, and drew over it to check I could do it properly:

Coloured in version
Final outline shape


I made two of the same design in case one got broken. The outlines I made the night before, and then filled in with more runny icing (the same method as the floodwork flowers I made a few months ago).
Outlines
Finished designs

The cake is fruit cake iced with marzipan and sugarpaste. I added a yellow ribbon around the base as well. This is it after icing:

It was an eight inch square cake on an eight inch board, so I put it in an eight inch box and took it on a plane to the funeral. It survived very well under the seat in front of me! The edges of the icing cracked a little where they were squashed by the box but mostly it was fine.
The decoration I took on the greaseproof paper as well, and that also survived. However when I tried to take the decoration off the paper, it cracked into many tiny pieces. I think despite my simplifying, it was still too complicated a design for this method. I probably should have iced it onto a plaque of icing so that it didn't need peeling off the paper, or just cut around the design on the paper!
Better luck next time.

July 14, 2011

Pizza cake - 13/7/11

It's been a while since I last made a cake, so yesterday I got together with my friend and we made a cake to look like a pizza. The idea came from Making Great Cakes, another cake book I seem to have acquired.
The cake itself is a 9" (23cm) round madeira cake, as I need to practice making sponge cakes as well as fruit. So we cut the top off and turned the cake upside down, then added some red buttercream for the tomato sauce:
lots of red food colouring everywhere
 Next was some cheese, this is yellow sugarpaste (fondant icing) grated with a cheese grater:
Then we added some sausage (red marbled with a bit of green, made into a roll and sliced) and some green leaves and green herbs for a garnish:
you could also do the herbs with dessicated coconut, but we didn't have any to hand
The beauty of this is that you could do whatever toppings you liked, as long as you could make them with icing. Also the positioning doesn't have to be perfect because it never is on a real pizza!